Monthly Archives: May 2012

Receiving Blanket

I’m the first to admit that I’m not one to make up my own patterns, but I *kind of* did here.

When Munchkin was a baby, we had a receiving blanket from Old Navy (it was a gift) that was much nicer than the “normal” ones from the less expensive stores. It was two-sided for one thing, and made of nicer, thicker material for another. I took that basic idea and put this one together. I also took pictures along the way so I could share with you how to do it should you want to make one.

1. Cut your fabric. You’ll need two pieces each about 35-37 inches square, depending on how big you want your finished blanket to be. You can use the same pattern or a different one for front and back; it’s entirely up to you. I cut mine about 37″ because I just have a gut feeling that Small Fry is going to be bigger than either of his brothers. Time will tell on that account :).


2. Using anything round (you can see that I just used a can of water chestnuts) to round the corners. Mark around the can (or other item) with a marking pencil. Do this on all 4 corners of both pieces of fabric.

3. Cut along the lines of all 8 corners.

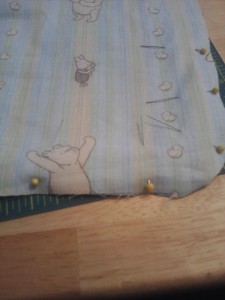
4. Pin your front and back to each other, right sides together.

5. Sew a quarter-inch seam all the way around, leaving just enough room to turn it right side out. 4-6 inches should be enough, but if you’re worried about it, you can always leave more.

6. Clip the rounded corners. Turn.

7. Press the edges so they’re nice and crisp. (Yes, my ironing board consists of a towel laid out on my table. We try to only have things in our house that are multipurpose, and an ironing board doesn’t meet that qualification.)

8. Pin the opening (from where you turned the blanket) shut. Make sure to fold the edges under so it matches the rest of the blanket. The last thing you want is raw edges.

9. Top stitch close to the edge all the way around, including the opening.

10. Enjoy your new blanket! I’m sure the baby who receives it will :).

Diaper Bag for Small Fry

I found a great deal on some fabric over the weekend, so with hubby’s blessing, bought the rest of the bolt of two different fabrics for nursery projects. This diaper bag, made with the tutorial over on A Mingled Yarn’s blog, was my first project. I think it may be the most professional-looking thing I’ve ever made. It’s a great bag. There are 5 external pockets, 5 internal pockets, plus the main one. Now all I need is the g-Diapers (if you haven’t heard of g-Diapers, check out their site; they’re the perfect combination of cloth and disposables with cloth outers and flushable liners – fabulous!) starter kit to fill it up with before baby arrives! For those of you keeping track with me, there’s about 6 1/2 weeks left!

Look for posts over the next few days of the other projects I’ve got planned with these fabrics :).

Polar Bear Blanket for Munchkin

After finishing the two afghans for the new baby, Seahawk (my 8yo) said he wanted one of his own; Munchkin (my 5yo) said he didn’t. Well, after seeing Seahawk’s blanket coming together, he changed his mind!

I wanted to do a different pattern than the one I’d been using for his, just for a change, so I had him look through a few fairly simple patterns I’d saved over the previous couple of weeks, and he picked this one. The ironic thing is that I didn’t realize until I started reading the pattern and stitching, but it turns out it was the exact same stitch pattern as the blue/blue afghan for Small Fry and the red/blue/green one for Seahawk! This one’s just put together a little bit differently (and done with a smaller hook). It’s a bit small for him, unfortunately, but he loves it all the same :). My plan is to just add additional borders at some point – if he’ll ever let me have it back long enough to do so!

The bear has lovingly been named “Little Quilt Bob.” (Munchkin is just learning the difference between the different kinds of blankets, and since prior to this, all I’ve made are quilts, every blanket I make is a “quilt” now.)

I found the pattern over on the website for Red Heart yarn. Click HERE if you’re interested in making one of your own!

Sun Hats

My kids both have red hair, which means they’re very fair skinned and sunburn easily. But they both hate having sunscreen on their faces – which actually works okay since I am NOT fair skinned and never burn, therefore forget to slather them *bad mom*. So this year, I decided to try something new in the hopes that we could avoid having them burn too badly: I made them sun hats. I scoured Google for patterns both in crochet and sewing varieties. I tried a fabric one first, but I wasn’t thrilled with the way it turned out, so I scrapped that idea (no pun intended ;)). The next day, I was looking at a video tutorial on YouTube (hadn’t actually started watching it yet) on baby booties when one of the “suggested videos” caught my eye. It was a brimmed hat, which I thought would be perfect for the boys. I had M with me in my little sanctuary, so I had him pick a color from my stash (he chose light blue) and I got to work. Roughly 3 hours later, he had a hat. Next up was A’s. It took him a while to choose the color; in the end, he went with red – which I could have predicted, since that’s his favorite. I only got about half done with his that night, but easily finished it before lunch.

Now comes the hard part: reminding them to wear them every day!!

I’ve included at the bottom of this post the video tutorial for the hats if you’re interested in making one of your own. It’s very easy, and I definitely recommend trying it if you’re in the market for anything even remotely similar. Doesn’t take too much yarn, either, which is always a plus. One thing I encountered that you should be aware of should you make one (or more!) of these hats: it takes on a taco-shell-like shape for the first several rows. Once you get to around row 10, though, it evens out and finds its place as a hat.

If you prefer written instructions rather than a video, click HERE for the link to the Crochet Geek blog. Her instructions are clear and concise. If you know even the basics of crochet, you shouldn’t have any trouble following them.

Happy stitching!!

Happy Mother’s Day!


I know I’m a day late here, but that’s okay :).

I subscribe to the JoAnn ad, mostly for the 40% off coupon that’s always in there. Sometimes there’s an additional gem, though; the April ad was was of those times. They were advertising something that was taking place in all of their stores, not just the bigger ones: “Kids, come make your mom a cupcake magnet for Mother’s Day.” Well, my kids love making crafts of all kinds (much to the detriment of the cleanliness of my house a lot of the time!), so this sounded like a perfect opportunity for them to get to make an “official” craft. I recruited my husband to take them in (at ages 8 and 5, they were not interested in letting me take them!) and make these crafts. They were so proud of them that they couldn’t even wait until Sunday to present them to me. Therefore, they’ve had a proud spot on my refrigerator since Saturday afternoon :D.